Showing posts with label crafts. Show all posts

Monday, November 21, 2011

Thanks-Giving Day 21 & Cute Craft Ideas - RTR!

Today's note of gratitude may sound a little weird, but then I am a little weird. LOL! Anywho. I'm thankful for the day, my dad suggested that I take a photography course at school. He had this 1970 something Minolta camera and never really knew how to use it (all these years). There are SEVERAL family photos that are over exposed, under exposed or that funky orange color. I needed an elective for school and he wanted me to teach him how to use his camera. I enjoyed taking the class a lot more than I thought I would and it actually sparked my on going interest in photography. I did learn how to use my dad's camera and had some pretty good photos developed from it. To this day, you'll see some of my photo posts. I am still learning new tips and effects. Not too long ago, my dad gave me his old Minolta camera. The film camera that started my photo taking hobby. Thanks Dad! I love you!


Photobucket
Hanging Paper Maple Leaves from Craft Ideas

What You'll Need:
- scrapbook paper in the colors of the season
- Spellbinders Set of maple leaves
- Wizard or Double-Do XL cutting and embossing machines
- stick glue
- sewing machine and matching thread

Instructions:

1. For each leaf you need to cut out 10 shapes (5 reversed). Because one side of the paper is white, glue 2 leaves back to back so that both sides are printed. When finished, you will have 5 sets of “doubled leaves”.
2. Line the leaves up in a stack and paper clip the sides together to hold in place.
3. Sew a straight line down the center of the stack to sew the leaves together and remove from the machine.
4. Cut away the excess bottom thread. Use the top thread to hang the leaves up.

Photobucket
Salt Dough Leaf Prints from The Artist Woman

What You'll Need:
salt dough, recipe to follow
artificial silk leaves
round container to use as cutter
oven
acrylic paint
mod podge for sealer

Salt Dough Recipe
4 cups flour
1 cup salt
1 1/2 - 2 cups water
extra flour for kneading

Mix first 3 ingredients together to form a nice soft dough. Knead smooth with extra flour. The more you knead this dough the easier it is to work with.


Keep leftover dough in the fridge.

Instructions:
Make up your salt dough. This recipe will make enough for 8 rounds.

Roll out dough and the using circular container or bowl, (coffee can) cut your rounds.

Pick a leaf for your design. I initially tried this with fresh leaves but they did not leave a good imprint. I think it would have worked with clay.

The silk leaves leave a better impression in the salt dough.

Place where you want it and press the leaf into the dough.

When you lift it off you should have a nice impression.

Place on a parchment or foil covered cookie sheet and bake at 250 degrees for about 2 - 3 hours or until hard.

Let cool.

Take some acrylic paint in Autumn colors.

After trial and error I found the best way to paint these is to paint the leaves in different colors first.
Let dry.

Then using dark brown paint that you have watered down apply a wash, like an antiquing glaze to the entire surface. The dark color picks up the veining in the leaf and still lets the Autumn color show thru.

Let dry and then apply a coat of glossy Mod Podge as a sealer.

Photobucket
Chocolate Acorn Cookies from The Celebration Shoppe

You’ll need:
mini Keebler Stripe cookies
Hershey’s Kisses
small piece of black licorice for your stem.

I attached them with a small dot of icing and done.


Photobucket

It's that time of year again!
ROLL TIDE ROLL!!!!!

Mirya

Sunday, November 20, 2011

Thanks-Giving Day 20 & A Little Crafty (of course)

This afternoon, I had the joyful opportunity to sit down and have a lovely pre-Thanksgiving dinner with my parents, Doug's parents and Katie at church. Our church does this every year, where we try to get together at our facility with our friends and loved ones. We are all served a traditional supper by our wonderful deacons by candlelight and serenaded by a few choir members. After dinner, Bro. Steve says a few words, followed by communion. Then, we are dismissed by prayer. I really enjoyed tonight with my family.

So tonight, I'm thankful for still having the ability to get together with my family and give thanks until the Lord for all He has done in my life.

Photobucket
Katie's Thankful Tree centerpiece
Photobucket
I thought this was touching.  She is thankful for "Jeasiss" aka Jesus

Checking in on my blogs that I like to follow, I caught a glimpse of this precious Snowman.  I have a weak spot when it comes to snowmen.  I just think they are so sweet.  This guy (below) is chilling as a great centerpiece from Shindig Parties.  I fell in LOVE!  I breezed through the instructions on how to make this little guy and it sounds pretty simple.  I don't know if I'll be able to make him this year, but I had to share him with you.  CLICK HERE for instructions and further information. 

Photobucket

Mirya

Saturday, November 19, 2011

Thanks-Giving Day 19 & Blessing Mix

I'm thankful for Adobe Photoshop and having the ability to do so many different, fun things. YAY!

Photobucket
I've been a little busy making some tasty hostess gifts for our guests this Thanksgiving. It took me a few days, but I put together the final touch last night. I made enough Blessing Mix for an army. I ended up making 43 gifts. Shew! I got this idea from Caramel Potatoes.   I wanted to put my own spin on this treat.  I thought it would be nice to stick the bag full of mix inside a paper cornucopia.  I didn't like the idea of putting Hershey's Kisses inside the bag with the rest of my mix, so I place a little double sided tape on the bottom and stuck it on top the bag.  I think it turned out nice.  After Halloween, I couldn't find any candy corn.  It's the only thing that's missing from this mix, so if you are planning on making this next year - BUY the CANDY CORN ahead of time. 
Blessing Mix Tag

I got the cornucopia template from Make and Takes CLICK HERE for free template and instructions.

Mirya

Friday, November 18, 2011

Thanks-Giving Day 17 & 18 and Thanksgiving Decorating Ideas

I'm thankful for . . .
  • having the chance to be involved in so many wonderful opportunities in my life, whether it was on the job or volunteer work. It was and is truly a blessing! 
  • having the opportunity to visit so many places all over the country.  I was one of the blessed children with parents that loved to travel.  My grandparents lived up North, so we would drive 12+ hours to visit them.  The older I got, the more I appreciated seeing the sights.  I still remember the two week trip in the late 80s.  We drove to North Dakota and all down South, to New Mexico and across the big state of Texas.  We visited beautiful landmarks and family.  It was great!  I'll never forget. 

Thanksgiving Decorating Ideas
Thankful Tree
Thankful Tree from Family Fun
The kids and I just finished our Thankful tree this past week.  Katie and Nia traced the leaf templates for me on construction paper.  They wanted to help cut them out, but I felt that I should do this job.  Katie wrote on the leaves of all the people and things that she is grateful for.  It was sweet, she even wrote her P.E. coach's name.  She really does like Coach B.

Just a couple decorations that I thought would look great this Thanksgiving.

Autumn Decor

Pinecone Wreath
from Better Homes and Gardens
for other creative ideas, recipes and crafts, just check out my Pin.
Mirya

Wednesday, November 16, 2011

Thanks-Giving Day 15 & 16 and more Thanksgiving Ideas

I'm thankful for . . .
  • the simple things of life. Out of the blue, my son will reach over and grab my hand to hold in his. My daughter will come up and give me the biggest hug just for the heck of it. They are such sweet kids and I love them so much. My husband will make arrangements for us to have a date night, without children, just to enjoy each other's company.
  • I think I must have the largest sweet tooth everah and I've got CHOCOLATE right at the top of that list.  I just LOVE chocolate, no matter how bitterly dark or sweet milk chocolaty.  It's an addiction I know, but one I almost can not live without. 

Photobucket
Pilgrim Candy Wrapper from Laurie Furnell
Laurie's blog offers this free printable candy wrapper for this Thanksgiving holiday, so go on over and take advantage of this great gift.
Photobucket
Tom Turkey Cookie from Seventh House On The Left
Is this not precious?  I love it, I just wish I have the time and patience to make these cuties.  Hopefully, you'll have that chance.

Ingredients:
Nutter Butter Cookies
M&Ms Minis (brown only)
White Cookie Icing
Red Jelly Bellys
Orange Jelly Bellys
Yellow Jelly Bellys
Candy Corn
Reese Cups (full sized)
Nabisco Famous Chocolate Wafer Cookies

The assembly process is pretty much self explanatory. Just use the photo above as your guideline. Simple as that! However, we do have a few tips and tricks to pass along:
  • The secret is in the icing. Over the years, we have tried several icings. Not only does it have to taste good, but it also needs to serve as “glue” to keep the Little Gobblers in one piece. Without good stiff icing, let’s just say they won’t ride in the car very well. In our opinion, Betty Crocker Cookie Icing works best. One tube will make about 6 Little Gobblers.
  • Hunt them down. The Nabisco Famous Chocolate Wafer Cookies are used for the base and the back of the turkey. Sometimes, they can be a little hard to find. But if your grocery store carries them, you will find them in the ice cream topping section (you would think they would be in the cookie section, right?). But if you have trouble finding them, thanks to the World Wide Web, you can purchase them online. Or you can visit the Nabisco website and search for them by zip code. Also, make sure you buy an extra box because they tend to break very easily.
  • From Point A to Point B. First of all, you need to make sure your Little Gobblers have enough time to sit and hang out before you show them off to your friends and family. When transporting these little guys, we line the bottom of deep Rubbermaid containers with paper towels. Then place the turkeys on the paper towels diagonally side by side (so the feathers don’t hit each other). The paper towels help the turkeys stay in one place. If we are making a whole flock of Little Gobblers, we like to use the disposable roasting pans.
Photobucket
Parents Magazine  posted these sweet gobblers

Make It: Glue google eyes onto small pom-poms and let them dry. Help your kids fold chenille stems into legs and feet and glue them onto the pinecone. Cut out a triangular beak from orange or yellow foam. Glue on the eyes and the beak; let the creature dry completely before beginning a fun game of make-believe with your kids.

Mirya

Wednesday, October 26, 2011

Red Ribbon Week and Halloween Craft Ideas

My little diva hated to see last weekend end. As you know, she got to go home with her BFF, "A" after school Friday. Saturday, I brought A home with us because her parents were going to the game in T-town and she didn't want to go with them. We loved having her here. She is such a sweetie. Her and Diva stayed in Diva's room most of the day, watching movies, putting on plays, musicals, concerts and loved having Flash chase them all over the house. LOL!

This week is "Red Ribbon Week" at school. Each day the students do or wear something specific. Monday was red shirt day. Tuesday was Pajama Day (check out the picture). Today was crazy sock day. Tomorrow is hat day and Friday will be school spirit day. Next Monday (Halloween), the students are asked to dress up as a storybook character. Diva and I talked about dressing her up as Clara in "The Nutcracker," but she wanted to wear her witch's costume. So, Diva will be Winfred Witch in the storybook "Winfred Witch and Her Very Own Cat." The students will get to take their storybook with them to school to share, which I think is neat.
Photobucket
It is cool in the mornings, you can tell it in this picture.
Photobucket
My babies in their jammies.

All month, I kept forgetting to put our custom made CD of Halloween music in my vehicle for us to listen to in the mornings. I think I'm kind of glad because that's all my children want to listen to as soon as they step inside the car. There are a total of 17 different songs (Devil Went Down To Georgia, Who Can It Be Now?, Weird Science, Thriller, Ghostbusters, Monster Mash, Maniac, Halloween Theme, etc.) We began playing our special Halloween music last weekend. Flash insists that we play 3 out of the 17 songs over and over. They are "Monster Mash", "Ghostbusters", and "Thriller". I remember Diva was the same way at that age. Now that she's a little older she is beginning to like the other songs more, but not Flash.

Flash is doing well with his color names. He gets them a little mixed up at times, but he is very eager to learn. He is putting together 10-12 piece puzzles on his own with very little help. He loves to play games. I have him match an object with it's silhouette. Then, we match same color objects, to practice with same color concept. He does real good with these games. I introduced to him, paint markers. Oh my gosh! He loves them and I like them because they are washable and not so messy, plus it's a good way to teach color recognition.
Photobucket
With help, he can count to 10. By using the markers, I'm trying to get him to count to 5 on his own. He gets a little confused, but he is getting there.

I just haven't had much time or money to do a whole lot of Halloween crafts this year. But I can share the great ideas with you.
Photobucket
by Trey and Lucy
I thought about making these sweetie with Diva's class, but I forgot that I had already printed out the labels for the treat bags.  After that I haven't had time to make them.  There's always next year.
Photobucket
by Parent Magazine
On the way to school, one resident has her dancing ghost in a circle just off her hill.  So cute and I've wanted to do the same thing now for a couple years.  Oh well. 
Photobucket
by Miner Moments
I LOVE this idea and had so hoped to have the time and money to do it.  PRECIOUS! 
Photobucket
by Parents Magazine
This looks so simple, but I just don't have the time to make them.  It will just have to make my list next year.
Photobucket
by Everyday Is a Crafting Day
This was on my list last year.  I even made sure to have my cheese cloth in stock, but no ghost yet.  Ugh!

For other great ideas for Halloween or other upcoming Holidays, you can find them on Pinterest.  I am absolutely addicted to Pinterest.  A lot of my family and friends have also joined Pinterest.  It's a great place to find and pin all of the things you LOVE. Happy Pinning!
Mirya

Friday, October 14, 2011

Harvest Season Spirit

Photobucket
Now that I made my first ghost, I wanted to be creative with the second one.  This time, I supported the frame by adding more wire, from a cut wire hanger.  I also added a more frilly bow with furry boa and hair bow. 
Photobucket
I've been a little busy, decorating for Harvest Season.  It's amazing how you put out a few things and it gets you into a great spirit.  A table full of different sized gourds and pumpkins.  I still plan on making some salt dough characters and spooky trees.  Where I'm going to put them?  I have NO idea!  LOL!  Would someone like them? LOL! My hanging "Halloween Greetings" card, I purchased from one of my favorite stores "World Market." 
Photobucket
The "Trick or Treat" beggers and haunted house with graveyard, I purchased from Big Lots for $7 each.  I absolutely fell in love with them. 

I must tell you that you will have to start checking into Eighteen25 beginning tomorrow for all the Halloween craft and cooking ideas Link Up Party.  I'm thinking about sharing my crafts this year.  What do you think?  I know last year, I had so much fun at their Halloween Link Up Party.  I posted a couple of my crafts, but I received so many other inspirations.  I encourage you to link up, browse, and just have good fun.

Photobucket

Oh and I guess you can see from the photo above, I finally received my Bama Cross today.  Don't you just LOVE IT?!?  I'm so tickled.  A sweet sweet lady from Mississippi makes all kinds of these crosses for a living.  She makes all sizes.  Mine is considered large and is perfect for the front door.  Instead of displaying on my front door, I've got it in my hallway because I didn't want to take down my Halloween wreath that I just made.  Mrs. D had my cross ready for quite sometime.  Unfortunately at the time that she was ready to ship it to me, her son had an accident.  Isn't that awful?  Please keep him in your thoughts and prayers.  I asked her if he was doing better, but she hasn't given me a response back.  If you are interested in purchasing one of these crosses (in any color), please leave me a comment along with your name and web address and I would be glad to get you in connect with Mrs. D. 
Happy Harvest!
Mirya

Wednesday, October 12, 2011

Black Boa Halloween Wreath

Photobucket
Well, I finally finished my Halloween wreath. I just love it! The only thing is my guests will be able to see at the door and not so much at the driveway. I guess that's what I get for having a dark colored wood door. LOL! I've had a few sweet compliments, but again I had to bring it to my guests attention.

What you need:
16" straw wreath
7 black feather boas
Floral pins
Ribbon
Halloween decorations to your taste

I didn't take the plastic off the straw wreath because I knew that the straw would end up all over my floor.  My first 2 feather boas were shedding everywhere before I could finish the wreath.  The next 5 boas, I picked up the fur feather boas.  They were thinner, but seemed to work better.  The poor clerk at my Hobby Lobby tried to get me to purchase the individual feathers, after I explained to her what I needed the boas for.  Now, let me ask you one thing.  Can you imagine me hot glue each individual feather to this wreath?  I'm not out of my mind.  After I realized that she was serious, I shut my mouth.  Thanked her and purchased the fur feather boas.  That's why I had to use so many boas, but so worth it.  I just wrapped the boas around the wreath and secured it with the floral pins.   I tied a decorative ribbon at the top for hanging purposes and made a bow on the wreath with the ribbon left over.  Have fun decorating! 
Photobucket
The wreath shown at my front door. 

Mirya

Monday, October 10, 2011

Lighted Ghosts

Photobucket

Light up your Halloween by making this ghost for your front door.  This ghost was fun and simple to make.  I plan on making one more ghost to greet our little Trick-or-Treaters.  Katie hasn't seen this ghost yet and she is going to flip out in the morning. 

You can make this ghost too.
 
All you need are:
Twin size white flat sheet
Sheet of black felt
Tomato cage
100 count white Christmas lights
Black Ribbon
Glue gun
Safety pins
Scissors
Duck Tape
Needle nose pliers
Wire cutters
  1. Take your tomato cage with top down (flat side) and stakes sticking straight up.
  2. Bend the metal stakes slightly to make a round head for our ghost greeter.
  3. Duck tape the stakes securely at the top, forming the ghost's head. 
  4. Begin securely (using cable ties) stringing your lights around the metal cage. Begin at the bottom first.  I followed the wire all around and up and down.  There's no wrong or correct way of doing this.
  5. Cut all the tails left on the cable ties.  Making it nice and neat.
  6. Fold your twin sheet in half.
  7. Drape it over the frame.
  8. Once you've equally created your ghost's body.  Tuck in the sides and safety pin them.  This secures the ghost's shape and keeps from the lights being exposed.
  9. Free hand draw an eye and mouth template.  I made mine approximately a 4 inch oval shape with a triangle inside cut, to make it look like the ghost was looking off to his side.  Gives it character.
  10. For the mouth, I cut a 4 1/2 inch oval shape. 
  11. Lay the templates (eye & mouth) on top of the black felt.  Secure it with a safety pin.
  12. Cut out 2 eyes and 1 mouth.
  13. Hot glue them onto the ghost's body.
  14. Tie a black ribbon around the ghost's neck area.  To keep it secure place a dot of hot glue on the sheet and press the ribbon on to it. 
Viola! 

There are other ways to make this ghost out of the tomato cages.  If you don't want to see the lights in the head portion, you can simply stick a large round styrofoam ball in the stakes.  The styrofoam ball becomes the ghost's head.  I didn't want to use the styrofoam because I wanted to see the ghost's face all lite-up. 

For arms, simply cut some durable wire and twist around the metal part of the cage on both sides.  With your pliers, curl your wire around so it won't poke out so much.  This makes the sheet stick out a little more. 

You can also apply wire legs for the ghosts to be a little taller, probably a plant stand or set it on top of an upside down pot.  Remember the sheet covers what's underneath. 

There really is no wrong way to create your friendly ghost.  So create and have fun with it. 

More crafts in the making:
Black Boa Wreath
                                                            . . . stay tuned!


Mirya

Monday, August 1, 2011

Did You Know?

I've got Colton lying down for his afternoon nap. Katie's in her room playing on her computer. I've got clothes in the wash and I just finished washing dishes in the sink. It's break time.

What better way to multi-task than watch "Days of Our Lives" and do a little catch up from the bloggers that I love to follow. Y'all I've learned so much in the past 30 minutes. Crafting and baking tips that I never knew. Of course, I have to share with you. I mean, you just can't keep information like this from the public.

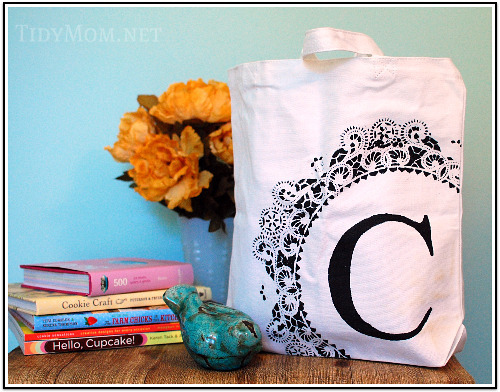
Did you know that you can use freezer paper as a stencil?

I would absolutely L.O.V.E to own a Silhouette, but since I don't Hobby Lobby shows you a tutorial right HERE on how to use freezer paper as custom stencils.  Very interesting. 
I think this handmade gift idea is sweet.

Do you know what Tidymom used as the lace stencil? 
Give up?  A doily.  A simple doily.  I couldn't believe it.  A lover of tote bags and I think it's something that every woman should own (more than one at that), I think this would make an excellent gift.  Tidymom mentioned making them for teachers for a back to school gift.  Great idea!


How can you make shaped cookies keep their shape? 

Well, Bake at 350 has the answer and it's so simple.  After she cuts out her special cookies, even the plain circles, she puts the cookie sheet in the freezer for 5 to 10 minutes at a time.  What?  She swears that is the answer for the perfectly shaped cookie.  Genius! 

Mirya

Wednesday, July 27, 2011

Check It Out

Y'all have to check this out!

A friend of mine has an online business, "RiffRaff and Butterbean". She specializes in making rag wreath for that special occasion. Angela has given me her blessing to feature her in my "Check It Out" edition.
I love my wreath! RTR! If you're not a Bama (I don't know why not), she also makes other collegiate to suit you.

I first met Angela when Doug and I moved next door to her homestead 16 years ago this November. We've been blessed to get to know her and her adorable parents. Since that time, she's married a respected man and gave birth to W. W is good friends with my daughter. Angela is so talented and creative, which is what brings us here today. I knew she dabbled a little in crafts, but nothing like this until last Christmas. Her and her mom, Mrs. Evelyn, gave Doug and I one of these beautiful Bama wreaths. You probably remember seeing a picture of it at Christmas time. The plaques are wooden and all hand painted. 
Here are some examples of the divided families


Professional Football Editions

Everyday Personalized Wreaths for the front door

All of her orders are custom made just for you.  In order to get in touch with Angela and RiffRaff and Butterbean, Click Here to get access to her Facebook page. She would be glad to give you a quote and answer any questions, you might have.  Be sure and tell her that you heard about her right here. 
Thanks!

All wreath photos are from RiffRaff & Butterbean

Mirya

Tuesday, July 26, 2011

Animal Print Ribbon Trees

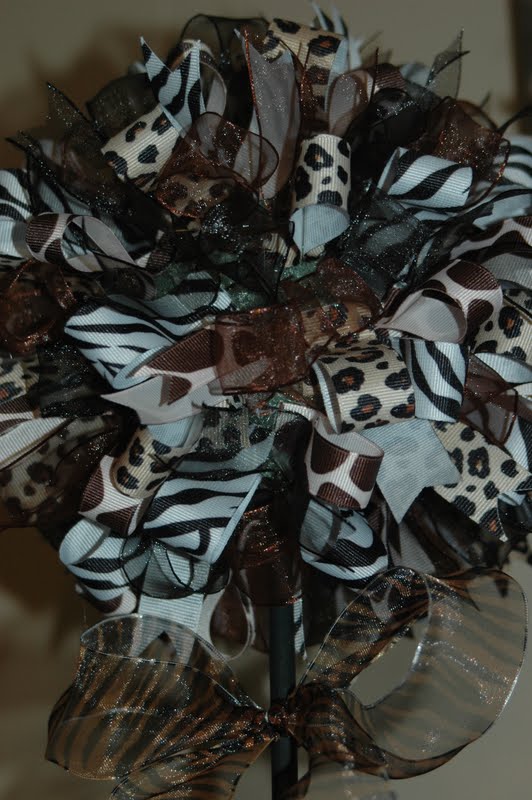
A while back I posted that y'all needed to stay tuned to the animal print ribbon trees, I will be making for my niece's baby shower and evenually her nursery.

Natalie called me this morning to see if she could come over and help me with the ribbon trees. Y'all they turned out exactly the way I had hoped they would. We worked most of the day and finished two out of three trees. They were simple to make, as long as you can put up with the burnt fingertips from the hot glue. LOL! Natalie and I walked away with our battle scars and are very pleased with our creation.

Now I know the professional crafters would sew their ribbons, but I don't have a sewing machine.  Not yet anyways.  HAHA! 


Natalie guessed that we ended up using approximately 2 rolls of ribbon per tree. Now I know that you're probably scratching her head thinking that you see more than 2 different types of ribbon in these trees.  Well, you're right.  I used 5 different patterned and solid rolls of ribbon - giraffe, zebra, leopard, black, and brown.  Natalie cut the ribbon at 4 1/2"; fold the cut ribbon in half - put a little hot glue on the ribbon and fuse together, making a loop.  You want to leave room at the ends of the ribbon to spread them apart, put a little hot glue and stick it on the styrofoam.  Some of the ribbon, we just folded long ways and cut at an angle on each end, to make it look forked on each end; I placed a little glue in the middle of the ribbon and stick it on the styrofoam to where the ribbon ends would stick out.  This project is a little time consuming, but so worth it. 
I painted the pot to resemble a tiger print.  The trunk of the tree is a 1/4" dowel pin, painted black.  Natalie and I were talking about how pretty the trees would be if you add a few feathers. 


Natalie and I enjoyed each others visit so much.  I wish we could more things like this more often, but I know she has her life (work, school and love life). 

Unfortunately, we ran out of ribbon.  So on to Hobby Lobby tomorrow.  YAY!  I told Natalie that I will just take my time getting the last ribbon tree done.  We went ahead and did all the painting and prepping for the last tree, we just need more ribbon to get it finished.  I'm so glad to have most of my work completed.  

Mirya